In the background of my overly hectic life at the moment, I decided that it would be a good idea to get some old photos scanned. I’d scanned them myself a while back, but only from the prints. They looked okay, but somehow I felt that there was detail lost in the process and that there might be more quality and lasting value in getting the negatives scanned. Inspired by this brilliant scheme, I wandered into Jessops on New Oxford Street and asked them how much it would cost to get my negatives scanned and put onto a CD. At the price of around ¬£10 a film, plus an extra ¬£5 to get them done at a high quality rate, I decided to only do eight films to start off with and see how they turned out.
The finished result has been … puzzling. So this is when I’m turning to you guys in the outside world and asking you whether the scans I’ve got back are reasonable, whether they’re sort of shitty, and whether there’s any way I could get better stuff done, or the same stuff done faster or cheaper.
The main thing that’s puzzled me about the photos I’ve got back is how noisy or grainy they appear to be. Most (but not all) of the photos are black and white. They are roughly 2500 x 3500 in size. And this is what most of them look at 100% resolution, as they have come off the CD they were supplied on with no edits to brightness / contrast / levels or anything.


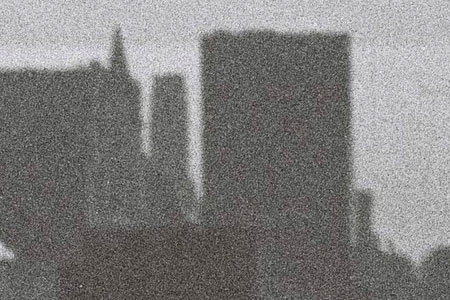
Now I’m not expecting these images to be looking beautiful and shiny and sharp – after all, they were taken on film and by a mostly-incompetent man in his early 20s with little experience using a camera. But I am really surprised by the grainy look and feel of it. It seems to me that a piece of photographic film shouldn’t have such enormous colour variation at this resolution. If it did by default, then you’d expect it to be impossible to get decent negatives blown up to A4 or larger, which it clearly isn’t. So I’m asking you guys out there whether this is normal, whether this is reasonable, or whether (as I’m wondering) it’s actually a function of a scanner that’s been pushed to its limit or been poorly used.
The reason I ask is because it’s actually proving surprisingly difficult for me to pull out the detail in some of these photos. The first thing I’m doing with any photo in Aperture is turning the noise reduction up to eleven. This in turn means I lose detail through the rest of the picture. It’s really aggravating.
I’m actually rather more inclined to believe that my reaction is the result of a personal failing on my part to understand the complexities of scanning from negatives than I am to believe that I’ve been given relatively expensive and poor quality service. So that’s why I need your help. If you know about this territory – if you think that even a bad photo shouldn’t end up looking so … particulate … when scanned at reasonably high resolution, then I want to know! Leave a comment below or e-mail me at the usual address, tom {at} the name of this website. Thanks.
13 replies on “I need some advice on scanning negatives…”
firstly, going to jessops is not ideal. what you want are one of the london scanning/repro houses. they will scan your negs on a drum or high quality flat bed scanner and the operators are used to doing this type of thing. it is more expensive (anywhere from £4 to £10 a scan) but you get discounts on bulk orders.
i would find one and send them 3 or 4 negs of a mixture of tones/ contrasts and quality. you’ll be amazed by the difference. you do pay for what you get…
(when i get scanning done for print work i would always use them and never somewhere like jessops)
Hard to say exactly what’s going on without seeing the originals and knowing what they did with them. Maybe someone was using the equipment incorrectly–who knows? But photographs are made of grain, aren’t they? And the more you zoom in, the more that grain becomes apparent. As a professional Photoshop worker I’m constantly *adding* grain in order to fake the appearance of genuine photographs.
You can scan negs yourself if you get a scanner with a transparency hood. These usually cost more than ordinary scanners but they give you control over your prints without incurring further cost.
This happened to me the one time I got Jessops to put my photos on CD at the same time as developing them. Not really acceptable.
You could quickly recoup the money you’re spending by buying a cheap flatbed scanner that can also scan negatives. The Epson 3490/3590 are fairly decent for less than ¬£50, and will give you 16-bit files that you can push/pull more detail out of. The more serious solution is to either buy a dedicated negative scanner, or go to a reprographics place for the frames you really want.
At the end of the day the grainyness of the original film cannot be removed without come digital jiggery-pokery, and in my (limited) experience the smoothing is obvious. Higher speed films (ISO 800 +) often have a grain noticable to the eye. As a rule the lower speed films have less grain (but obviously don’t work well in low light or with short exposures). If the original films were low speed (ISO 100-200) but you’re still getting grain, the I’d ask for a re-scan.
Agree with Matt. Get a drum scan done at a pro shop.
That said, the graininess may be due to the use of high speed film. Even ISO100 film is very grainy compared to the output of a DSLR.
I wouldn’t bother getting a scanner yourself, it’s simply not worth the time and hassle.
BTW, what resolution did Jessops give you back? I have some colour and b/w negs scanned by them @1536×1024 if you want to do a comparison.
Mine look much better than the results you have but this may be due to using low speed film (and possibly lower resolution output hiding the grain).
To add some more diversity to these answers, i’d say you shouldn’t want to scan negatives yourself, unless you’re a Photoshop Pro, and even then it’s a tedious, difficult and time-consuming process.
My experience with scanning negatives myself haven’t been too positive. While i’m certainly not a Photoshop rookie, i came across so many difficulties: the scanner added false light to the negative, i had to compensate for the colour of the negative, which gave the photos a double hue (i.e. too much red and too much green, which is near impossible to fix √°nd keep natural colours in the picture). The results were so difficult to process i only processed a couple of films and never touched my scanner again.
So my advice, see a professional. But you might want to check what these scans look like when you reprint them. Only a few days ago i got some scans back from a repro, and looking at them 100% in Photoshop, they looked really terrible, a bit like yours 🙂 But in print they turned out alright.
I often use Ilford HP5 400ASA B/W film and the result is very grainy. It’s due to the high ASA range of these films.
Ah, this really takes me back to developing my own film, good times. The graininess of the negative depends a lot on the speed of the film and whether it was ‘pushed’ in developing (i.e. developed as if it was higher speed than it was rated), but I can’t say I’ve ever seen grain this pronounced except in the Ilford ISO 1600 (or around there) stuff I used at some point. My impression is that the grain is being exagerated by less than good scan. I used to do scanning for a service bureau in Phila, and if the negative wasn’t sitting down on the plate nicely I would get more of a contrasty ‘projection’ of the image on the glass than a scan of the film itself, and that’s what this looks like to me. I bet if you get a real drum scan you will see dramatically different results (but can’t be sure etc. etc.).
I’ve had similarly dissapointing results from Jessops (and similar) outfits too.
In a previous life as a print designer, when quality was important you’d only ever get film scanned on a drum scanner – and you would certainly expect better results.
I have gotten reasonable results from high end flat bed scanners too – but this usually involved sitting with the operator and ensuring that they followed all of the necessary (and you’d think, obvious) procedures:
1. Ensuring that they taped the film down the right way up (emulsion down against the glass) so that the optical quality of the carrier didn’t work against you.
2. Ensuring that the film was sqaure – so that no rotation was necessary post scan.
3. Ensuring that sharpening wasn’t enabled – this is probably why your scans looks so grainy. The default setting on many scanners has a tendency to see film grains and enhance their edges.
4. And obviously – ensuring that the glass was cleaned thoroughly!
Personally – I always hoped that drum scanners would follow Moore’s Law and become affordable to the Prosumer market. My sad realisation was that I couldn’t really trust anyone (that I could afford to pay) to do a good job. Unfortunately, the success of digital cameras, and the subsequent reduction in demand for scanning has meant that they are most likely, to be rarer than before.
Again without seeing a full scan (mail me one if you like)
What file size were the scans you got? I have a Nikon film scanner at home and if I scan 35mm the file size come out at about 60mb at full resolution
Regarding grain: What were the iso ratings of the films you had scanned… it should say on the negative strips? If 400 or above then yes you would expect to see the level of noise you are getting as BW film of that iso level is generaly grainy, same for colour too.
Another thing to bare bear in mind is that BW scans will always look a little scrtachier /noisier than colour, as Digital ICE technology (automated removal of dust, scratches etc) which is built into most decent scanner ONLY works for colour scans. It cant handle black and white.
But as someone said, Jessops are pretty whack. I always reccomend Snappy Snaps on Wardour street as they are a pro-level lab. But when I say Wardour street I Mean that branch only, other Snappy Snaps can be dire.
If you really want to get the best scan for you buck, you need to know a little about how scanning works. I could go into it in great detail in the comment but http://www.scantips.com will set you in the right direction. Scanning good quality images is not that hard, a little maths, and basic grounding in the facts will set things right.
I recommend http://www.bayeux.co.uk/ – in Newman street; really nice chaps, really helpful, really good quality work for photographic stuff. They did some lovely 120 film work for me.